Do you have a gut feeling you’re pregnant? Are you stuck at home, feeling anxious, and want to find out right now?
Homemade pregnancy tests have existed for centuries, long before modern kits hit the pharmacy shelves. They are a quick, inexpensive way to quell your curiosity without leaving the house.
We spoke with women about these old-school methods, analyzed current trends, and dug into the science behind the reactions. While these DIY options are fun, it is vital to know how reliable they actually are before you celebrate.
We will cover accuracy levels, how these tests work, the best time to take them, and step-by-step instructions for the most popular methods.
Key Takeaways
- Homemade pregnancy tests are not scientifically proven and should be used for entertainment purposes only; they are not 100% accurate.
- These DIY methods attempt to detect human chorionic gonadotropin (hCG) in urine through chemical reactions with household items.
- For the best chance of accuracy, wait at least one week after a missed period and test using first-morning urine.
- Always confirm your results with a store-bought kit or a blood test at your doctor’s office.
How Accurate Are Homemade Pregnancy Tests?
Let’s be real: no pregnancy test is 100 percent accurate, but homemade versions are significantly less reliable than store-bought kits. While they are fun experiments, they are not scientifically proven medical tools. You must always confirm a potential pregnancy with a blood test or ultrasound through your OB-GYN or midwife.
Homemade tests are difficult to read. One person might see a reaction while another sees nothing. This subjectivity leads to frequent false results.
False-negatives
A false-positive means the test suggests pregnancy, but you are not pregnant. This is rare but can occur if you misread the chemical reaction, take fertility drugs containing hCG, or experience a chemical pregnancy (1).
We recommend taking a few different homemade tests rather than relying on one. If you get mixed results, wait a few days and try a standard over-the-counter kit.
How Do Homemade Pregnancy Tests Work?
Homemade tests operate on the same principle as any over-the-counter pregnancy test: they attempt to detect human chorionic gonadotropin (hCG). If the result is positive, you might see a chemical reaction (like fizzing or color change) between the hCG in your urine and the testing substance.
Your body begins producing hCG shortly after a fertilized egg attaches to the uterine wall. This hormone multiplies rapidly in early pregnancy, entering your bloodstream and urine (2).

When Should I Take the Test?
Take Note
However, not every woman tracks her cycle perfectly, and some experience implantation bleeding, which can be confused with a light period.
If you absolutely cannot wait, you can try testing as early as two weeks after conception. If you get a negative result, wait five days and try again.
Early Signs of Pregnancy
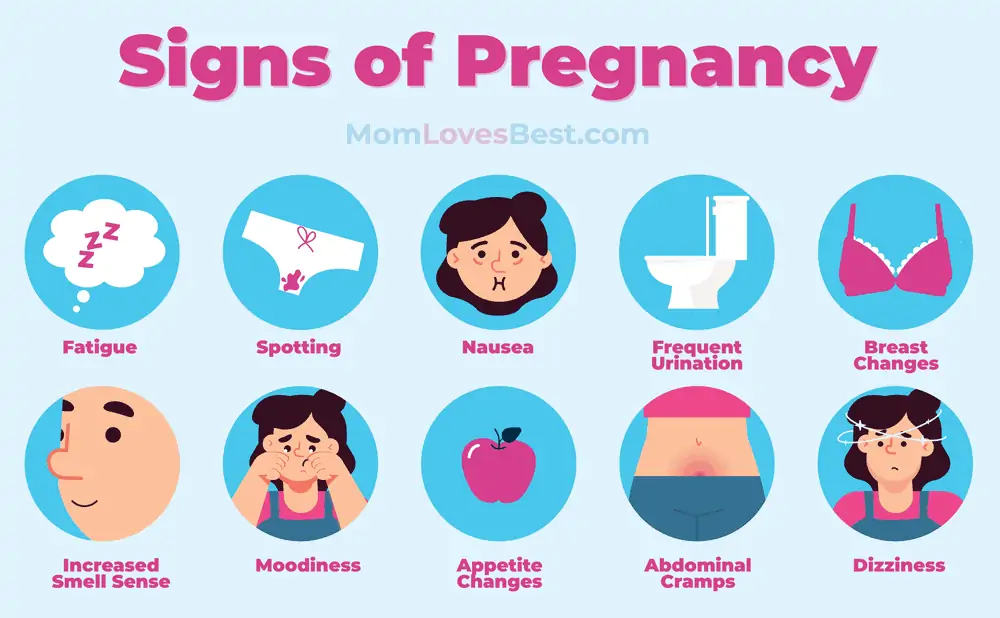
It might be time to take a test if you notice these common physical changes:
- Nausea or vomiting (morning sickness).
- Swollen, tender breasts.
- Frequent trips to the bathroom.
- Extreme fatigue.
- Specific food cravings or aversions.
- Abdominal bloating.
- Mild cramping (without a period).
- Mood swings.
- Dizziness or lightheadedness.
- Spotting.
How to Make a Homemade Pregnancy Test
We have compiled eight DIY tests you can create with standard household items. We included instructions and a guide on how to interpret the reactions.
Note: None of these are scientifically proven. Use them for fun, but trust a medical professional for the final word.
1. Urine in a Jar Test
This is the simplest method requiring only a clear container and time.
- Collect urine in a clean, clear jar or cup first thing in the morning.
- Place the jar on a flat surface and let it sit undisturbed for 24 hours.
- Negative Result: The urine looks the same.
Positive Result: A thin white layer forms on the surface of the urine.
2. Sugar Pregnancy Test
Sugar is a popular method because it allegedly clumps when it comes into contact with hCG.
- Put three teaspoons of white granulated sugar into a clean bowl.
- Urinate into a separate clean cup.
- Pour your urine over the sugar.
- Wait five to ten minutes.
- Negative Result: The sugar dissolves easily.
Positive Result: The sugar clumps together rather than dissolving.
3. Toothpaste Pregnancy Test
If you have white toothpaste, you can try this method. Avoid gel or colored stripes, as they may alter the visual result.
- Squeeze two tablespoons of plain white toothpaste into a container.
- Urinate into a cup and pour it onto the toothpaste.
- Wait five to ten minutes.
- Negative Result: No reaction occurs.
Positive Result: The toothpaste turns blue or begins to foam and froth.
4. Bleach Pregnancy Test
Bleach is a strong chemical that reacts quickly. Ensure you use plain bleach, not scented or chlorine-free versions.
Safety Warning: Bleach is hazardous. When mixed with ammonia (found in urine), it creates toxic fumes (3). Perform this test outside or in a well-ventilated area. Wear gloves and a mask.
- Pour one cup of bleach into a disposable bowl.
- Collect at least half a cup of urine in a separate container.
- Slowly add the urine to the bleach.
- Wait three to five minutes.
- Negative Result: No reaction or very minimal fizzing.
Positive Result: The mixture bubbles or fizzes aggressively.
Take Note
5. White Vinegar Pregnancy Test
Most kitchens have white vinegar. It is cheaper and safer than bleach.
- Pour half a cup of distilled white vinegar into a clean bowl.
- Urinate into a separate cup and add it to the vinegar.
- Wait three to five minutes.
- Negative Result: The color remains unchanged.
Positive Result: The mixture changes color.
6. Dandelion Leaves Test
If you prefer nature over chemicals, head to the backyard.
- Pick two or three fresh dandelion leaves and place them in a container.
- Urinate into a cup.
- Pour enough urine over the leaves to soak them completely.
- Wait ten minutes.
- Negative Result: The leaves look the same.
Positive Result: Red spots or blisters appear on the leaves.
7. Soap Pregnancy Test
Any standard bar soap or dish soap can work for this quick experiment.
- Place a small piece of soap or a squirt of dish soap in a bowl.
- Add two tablespoons of your urine to the soap.
- Wait five to ten minutes.
- Negative Result: The mixture stays flat.
Positive Result: The mixture froths or bubbles up significantly.
8. Baking Soda Gender Test
Already know you’re pregnant? This old wives’ tale claims to predict gender using baking soda.
- Put two tablespoons of baking soda in a bowl.
- Add your urine to the baking soda.
If it fizzes like a soda, rumor says it is a boy. If there is no reaction, it is a girl.
Remember
What if It’s Positive?
Seeing a positive result can trigger a flood of emotions. You might feel ecstatic, terrified, or simply overwhelmed. These feelings are normal.
We suggest talking to someone immediately, your partner, a close friend, or your mother. Sharing the news helps process the emotions.
Here are your next steps:
- Calculate the date: Note the first day of your last period to estimate your due date.
- Call the doctor: Schedule your first prenatal appointment to confirm the pregnancy medically.
- Take vitamins: Start a high-quality prenatal vitamin immediately.
- Review meds: Ask your doctor which of your current medications are safe.
- Cut caffeine: Limit caffeine intake to 200mg per day (roughly one 12-ounce coffee).
- Change your diet: Stop consuming alcohol, raw meat, unpasteurized dairy, and high-mercury fish (4).
- Get moving: Try low-impact pregnancy-safe exercises like walking, swimming, or prenatal yoga.
- Plan the announcement: Decide when to share the news. Tell your employer early enough to plan for leave.
- Document it: Buy a pregnancy journal and start reading books to prepare.
FAQs
Which Homemade Pregnancy Test Is the Most Accurate?
While none are scientifically verified, the bleach and sugar tests are the most popular anecdotes among women. However, “popular” does not equal “medical accuracy.” Always verify results with a pharmacy test.
Can I Use a Homemade Pregnancy Test at Night?
You can, but it is not recommended. Drinking fluids throughout the day dilutes your urine, lowering the hCG concentration. For the best chance of a reaction, test immediately after waking up.
Why Is My Urine Foaming with These Tests?
Proponents of DIY testing claim the foam is caused by the hCG hormone reacting with the testing agent (like soap, bleach, or vinegar). However, urine can also foam due to protein levels or simply the speed of urination.
Share Your Experience
Homemade pregnancy tests are a fun, inexpensive way to pass the time while waiting to take a real test. However, they are prone to error. Be sure to confirm any result with your OB-GYN or midwife to ensure you get the prenatal care you need.
Have you tried the sugar or bleach test? Did it work for you? Share your stories with the Mom Loves Best community in the comments below.