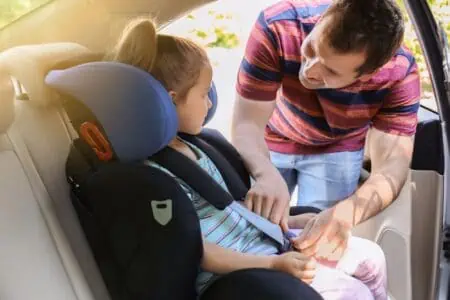
Let’s be real: installing a car seat feels like wrestling an octopus. According to studies, up to 95% of parents install infant car seats incorrectly (1). It turns out, clicking that seat into place is not as intuitive as the manual makes it look.
Every seat has different restrictions, and every vehicle has a unique backseat quirk. You need to know exactly how to marry the two for a rock-solid fit.
We are going to cut through the confusion. Read on to learn exactly how to install your car seat correctly so you can drive with total peace of mind.
Key Takeaways
- Location matters: The center of the back seat is statistically the safest spot, but a tight installation on the side is better than a loose one in the middle.
- Max out the limits: Keep children rear-facing until they reach the maximum height or weight limit allowed by your specific car seat manual.
- Choose one method: Secure the seat using either the LATCH system or the vehicle seat belt, but never both at the same time unless explicitly allowed.
- The inch test: A properly installed seat should not move more than one inch side-to-side or front-to-back at the belt path.
Where Should the Car Seat Go?
Before you haul the seat out to the driveway, grab two things: your vehicle owner’s manual and the car seat manual. You need to check the child passenger safety section in your car’s booklet to see exactly where a seat can go.
According to safety data, the safest position for your baby is the center of the second row (2). While head-on collisions are common, side impacts can be more severe. Placing the baby in the middle creates a buffer zone that protects them from crunch zones on both sides.
However, the middle spot isn’t always compatible. Many vehicles don’t have LATCH anchors in the center, or the seat has a “hump” that prevents a tight fit. If you can’t get a rock-solid install in the middle, the passenger side or driver side is a perfectly safe alternative.
LATCH stands for “Lower Anchors and Tethers for Children” (3). It was designed to standardize installation, and most vehicles made after 2002 have these anchors hidden in the seat bight (the crease between the cushions).
Always remember that the best place to put your car seat is where your vehicle permits it and you can get a proper installation. A car seat placed in the middle seat will not be safer if you cannot get a good installation in that seat.
Editor's Note:
Kristen Gardiner, CPSTDriver or Passenger Side: Which Is Better?
If the middle isn’t an option, you have to choose a side. In an accident, a driver instinctively swerves to protect their side of the car. Plus, having the baby on the driver’s side means you don’t have to walk around the vehicle to get them out.
However, the passenger side (curbside) is generally safer for loading and unloading if you park on streets. It also makes it easier to glance back at the baby while driving. Prioritize the side where you can get the tightest installation.
What If There’s More Than One Kid?
When you have a growing squad, car seat tetris gets real. If you have two kids, place the newborn or the least protected child in the center if possible. If the seats don’t fit side-by-side, use the two outboard seats.
Consider logistics, too. Put the child who takes the longest to buckle on the passenger side so you aren’t standing in traffic while adjusting straps.
Fitting three across is tricky. You might need to invest in specific narrow car seats designed for this puzzle. Remember, all children under 13 should ride in the back seat to avoid airbag injuries (4).
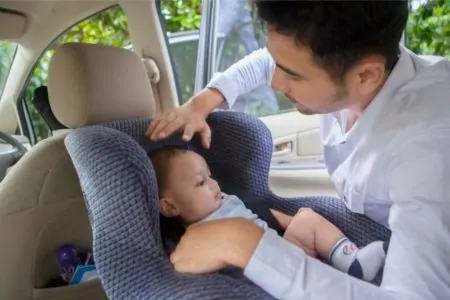
What Direction Should the Seat Face?
The golden rule is simple: keep your child rear-facing for as long as possible. Ignore the old advice about turning them around at age two. Instead, wait until they hit the maximum height or weight limit listed in your manual.
Infant car seats are rear-facing only and usually support babies up to 22, 35 pounds. Convertible seats have much higher limits, often allowing kids to rear-face up to 40 or 50 pounds.
Don’t worry about their legs touching the seat back. Kids are flexible. In a crash, a “broken leg” is preferable to a spinal injury. Statistics show that rear-facing kids suffer very few lower-extremity injuries (5).
When facing forward, a child’s heavy head is thrown violently forward in a crash, putting immense strain on the neck and spine. Rear-facing cradles the head, neck, and spine, distributing the crash forces across the shell of the seat.
Stay Away From The Front
At What Angle Should the Seat Recline?
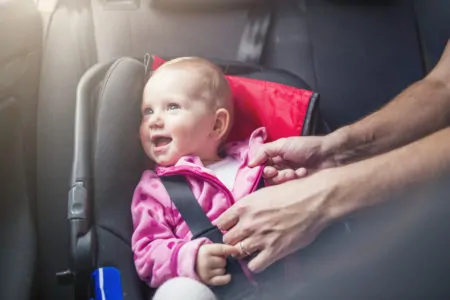
Getting the recline angle right isn’t just about comfort; it is about keeping your baby’s airway open. All seats have an angle indicator, either a bubble level, a ball, or a line on a sticker.
Newborns need a 45-degree recline. If the seat is too upright, their heavy head can flop forward, cutting off their oxygen supply. If it’s too flat, they could slide up and out of the harness in a crash.
If your back seat is sloped and you can’t get the angle right, check your manual. Many manufacturers allow you to use a tightly rolled towel or a pool noodle under the base to level it out.
As your child gains head control and grows older, the seat can usually be installed more upright (around 35 degrees). Always check the manual for specific rules based on your child’s weight.
What Installation Methods Are Available?
You have two main choices: the LATCH system or the vehicle seat belt.
Here is the most important rule: Choose one. Do not use both. Using both does not make the seat safer; it can actually put too much stress on the seat path during a crash. There are very rare exceptions (like some Nuna or Clek seats), but 99% of the time, it is an either/or situation.
LATCH Method
LATCH (Lower Anchors and Tethers for Children) was created to make installation easier without seat belts. It involves connecting hooks on your car seat to metal bars in your car’s seat bight.
Follow these steps for a secure LATCH install:
- Find the anchors: Locate the U-shaped metal bars in your vehicle seat’s crease. They might be marked by a small button or plastic cover.
- Route the strap: Make sure the LATCH strap is threaded through the correct belt path (rear-facing or forward-facing) and is free of twists.
- Click it in: Press the connectors onto the anchors until you hear a distinct click.
- Tighten it down: This is the workout part. Press down firmly on the center of the car seat with your hand (or knee, for convertible seats) while pulling the strap tail with all your might.
- Check the movement: Grab the seat at the belt path (not the top) and give it a firm shake. It should move less than one inch side-to-side or front-to-back.
Seat Belt Method
Using the seat belt is just as safe as LATCH, provided you lock it correctly. You must use this method once the combined weight of your child and the car seat exceeds 65 pounds (check your manual for the exact limit).
- Thread the belt: Route the vehicle seat belt through the appropriate belt path on the car seat. Ensure there are no twists.
- Buckle and lock: Click the belt in. Now, fully extend the shoulder belt from the retractor until it stops. As you feed it back in, you will hear a ratcheting clicking sound. This means the belt is in “locking mode.”
- Tighten and secure: Push down hard on the car seat. Feed the excess slack back into the retractor.
- Built-in lock-offs: Some car seats (like Britax ClickTight or Chico KeyFit) have built-in lock-offs. If yours does, you might not need to lock the retractor at the shoulder. Read your manual carefully.
- The inch test: Like with LATCH, grab the seat at the belt path. If it moves more than one inch, it is too loose.
Handy Car Seat Tips
Here are a few pro tips to ensure your little one travels safely every time.
- Skip the coat: Never strap a child in while they are wearing bulky winter coats. The puffiness compresses in a crash, leaving the straps too loose to hold them. Dress them in thin layers and put a blanket over the straps instead.
- Use the top tether: If your child is forward-facing, you must use the top tether. It attaches to an anchor behind the seat and significantly reduces head movement in a crash. This is a non-negotiable safety step.
- No sleeping in the house: If your baby falls asleep in the infant carrier, transfer them to a crib as soon as you get home. The angle of a car seat on the floor can cause their head to tip forward, posing a suffocation risk.
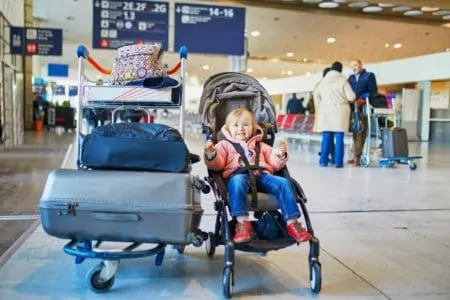
- Flying high: Most car seats are FAA-approved. It is safer for a baby to ride in a car seat on a plane than on your lap during turbulence.
- Avoid the “shopping cart clip”: Car seats aren’t designed to click onto the top of shopping carts. It makes the cart top-heavy and prone to tipping. Place the seat inside the large basket instead.
- Don’t rush the booster: Keep your child in a 5-point harness until they max out the height or weight limits (often up to 65 pounds). They need to be mature enough to sit still without slouching before moving to a booster seat, usually around age 5 or 6.
- Check expiration dates: Plastic degrades over time. Car seats expire, usually after 6 to 10 years. Check the sticker on the shell and never use an expired seat.
- Beware of used seats: Unless you trust the previous owner with your child’s life and know for a fact the seat has never been in a crash, buy new. Second-hand seats may have invisible hairline fractures.
- The pinch test: After buckling, try to pinch the webbing at the child’s shoulder. If you can pinch any fabric between your fingers, the straps are too loose.
- Harness height matters: For rear-facing, straps should come from at or below the shoulders. For forward-facing, they must come from at or above the shoulders.
- No aftermarket accessories: If it didn’t come in the box with your seat, don’t use it. Strap covers, seat protectors, and toys can interfere with the seat’s performance during a crash.
FAQs

How Do I Know If My Car Seat is Installed Correctly?
You know it is secure if you cannot move the seat more than one inch side-to-side or front-to-back when pulling at the belt path. Also, ensure the recline angle is correct and the harness passes the “pinch test.”

Which Car Seat Is Easiest to Install?
Seats with specialized tensioning technology are generally the easiest. Look for models featuring “ClickTight” (Britax), “SuperCinch” (Chicco), or “SnugLock” (Graco), which do most of the tightening work for you.

Why Is the Middle the Safest for a Car Seat?
The center seat is the furthest point from any side impact, creating a larger “crumple zone” between your child and the door. However, a solid installation on the side is always safer than a loose installation in the middle.

Do I Need an Infant Insert?
You only need an insert if your baby fits the specific weight criteria listed in your manual (usually for preemies or small newborns). Once they outgrow the weight limit or positioning guidelines for the insert, remove it immediately to ensure the harness fits properly.
What Does a Car Seat Anchor Point Look Like?
The lower anchors are small horizontal metal bars located in the crease between the back and bottom vehicle cushions. The top tether anchor is usually a metal ring or hook found on the package shelf, the back of the seat, or the ceiling of the cargo area.

What Are the Most Common Car Seat Mistakes?
The big three are: leaving the harness straps too loose (fail the pinch test), installing the seat too loosely (moves more than an inch), and turning the child forward-facing too early.

Can My Local Fire Department Install My Car Seat?
Some do, but not all firefighters are certified Child Passenger Safety Technicians (CPST). It is best to verify they have a certified tech on duty or search for a local inspection station through the Safe Kids Worldwide website.
Can I Use a Seat Protector Mat Under the Car Seat?
Generally, no. Most car seat manufacturers prohibit putting anything thick under the seat because it can mask a loose installation. Only use a mat if the specific car seat manufacturer makes one and approves it for use with your model.