Let’s be honest, breast pumps are lifesavers, but they aren’t always practical. Maybe you forgot a part at home, the batteries died, or you just want a break from the noise. Learning how to hand express breast milk is a survival skill every nursing mom needs in her back pocket.
As a lactation consultant, I consider this technique essential. It is free, requires no equipment, and allows you to relieve engorgement or harvest liquid gold anywhere, anytime.
Ready to learn the ropes? Here is everything you need to know to master the art of hand expression.
Key Takeaways
- Hand expression is a vital backup skill for when pumps fail, power is out, or you need on-the-go relief from engorgement.
- The “C-shape” hold is the gold standard technique; place your thumb and fingers opposite each other behind the areola.
- Avoiding sliding or friction is key to preventing tissue damage; always press back into the chest wall first.
- This method is particularly effective for harvesting colostrum in the early days or clearing stubborn clogged ducts.
Why Hand Express Instead of Pumping?
With so many high-tech breast pumps on the market, using your hands might feel old-fashioned. However, manual expression offers unique benefits that machines simply cannot replicate.
Here is why you should add this skill to your repertoire:
- Liquid Gold Collection: Newborns need colostrum, which is thick and comes in small amounts. Pumps often trap this precious fluid in the tubing. Your hands can collect every drop directly into a spoon or cup.
- Emergency Relief: Batteries die and parts break. If you are stuck at work or away from your baby without a working pump, hand expression prevents painful engorgement.
- Softening the Breasts: If your breasts are rock hard, your baby might struggle to latch. Expressing a small amount softens the areola, making it easier for your little one to feed.
- More Milk: Combining hand massage with pumping (hands-on pumping) can yield significantly more milk than pumping alone (1).
Hand expressing is also quiet, free, and creates skin-to-skin contact that helps stimulate your let-down reflex faster than cold plastic flanges.
How to Hand Express Breast Milk
Mastering this takes a little patience. Do not stress if you do not see sprays of milk on your first try. It is a learned skill, similar to riding a bike.
Preparation Steps
Set yourself up for success before you start.
- Clean Up: Wash your hands thoroughly with soap and warm water.
- Get Comfy: Sit in a relaxed position. Stress inhibits milk flow, so take a deep breath.
- Prepare the Container: Have a clean bowl or wide-mouthed bottle ready. If you are harvesting colostrum, you might express directly into a spoon.
- Warm Up: Apply a warm, wet towel to your breasts or massage them gently for a few minutes. This boosts circulation.
- Set the Mood: If you are away from your baby, look at a photo or video of them. This psychological trigger helps activate the let-down reflex (2).
The Technique (Step-by-Step)
This method is often referred to as the Marmet Technique. The goal is to drain the milk ducts located behind the nipple, not to squeeze the nipple itself.
- Position Your Hand: Form a “C” shape with your thumb and fingers. Place your thumb on top of the breast and your fingers underneath.
- Find the Spot: Position your fingers and thumb about one inch back from the nipple, usually just outside the areola. Every breast is different, so you may need to adjust slightly to find your ducts.
- Press Back: Gently press your thumb and fingers back toward your chest wall. Do not spread your fingers apart; move the breast tissue back against your ribs.
- Compress: Roll your thumb and fingers toward each other. Think of it as a rhythmic “press, compress, relax” motion. This action squeezes the milk ducts to eject the milk.
- Relax and Repeat: Release the pressure (without moving your hand placement) and repeat the rhythm.
- Rotate: Milk ducts are arranged like spokes on a wheel. Once the flow slows in one spot, move your hand to a “U” shape or diagonal position to drain other areas of the breast.
Common Mistakes to Avoid
If you are feeling pain or seeing bruises, check your technique against these common errors:
- Do not slide: Your fingers should not slide over the skin. This causes friction burns (“rug burn”). Your fingers should move with the skin.
- Do not squeeze the nipple: The milk is stored in the ducts behind the areola. Pinching the nipple is painful and stops the flow.
- Do not dig in: Deep pressure is good, but digging your fingertips into breast tissue can cause bruising. Use the pads of your fingers.
Pros and Cons of Manual Expression
Is this method right for you? Here is a quick breakdown to help you decide when to use it.
The Pros
- It costs zero dollars.
- You can do it anywhere (bathroom stall, car, bed).
- No parts to wash or sterilize.
- It is more comfortable for moms with sensitive nipples who hate the “tugging” sensation of pumps.
The Cons
- It is slower than a double electric pump.
- It can be tiring for your hands and wrists.
- There is a steeper learning curve compared to pushing a button on a machine.

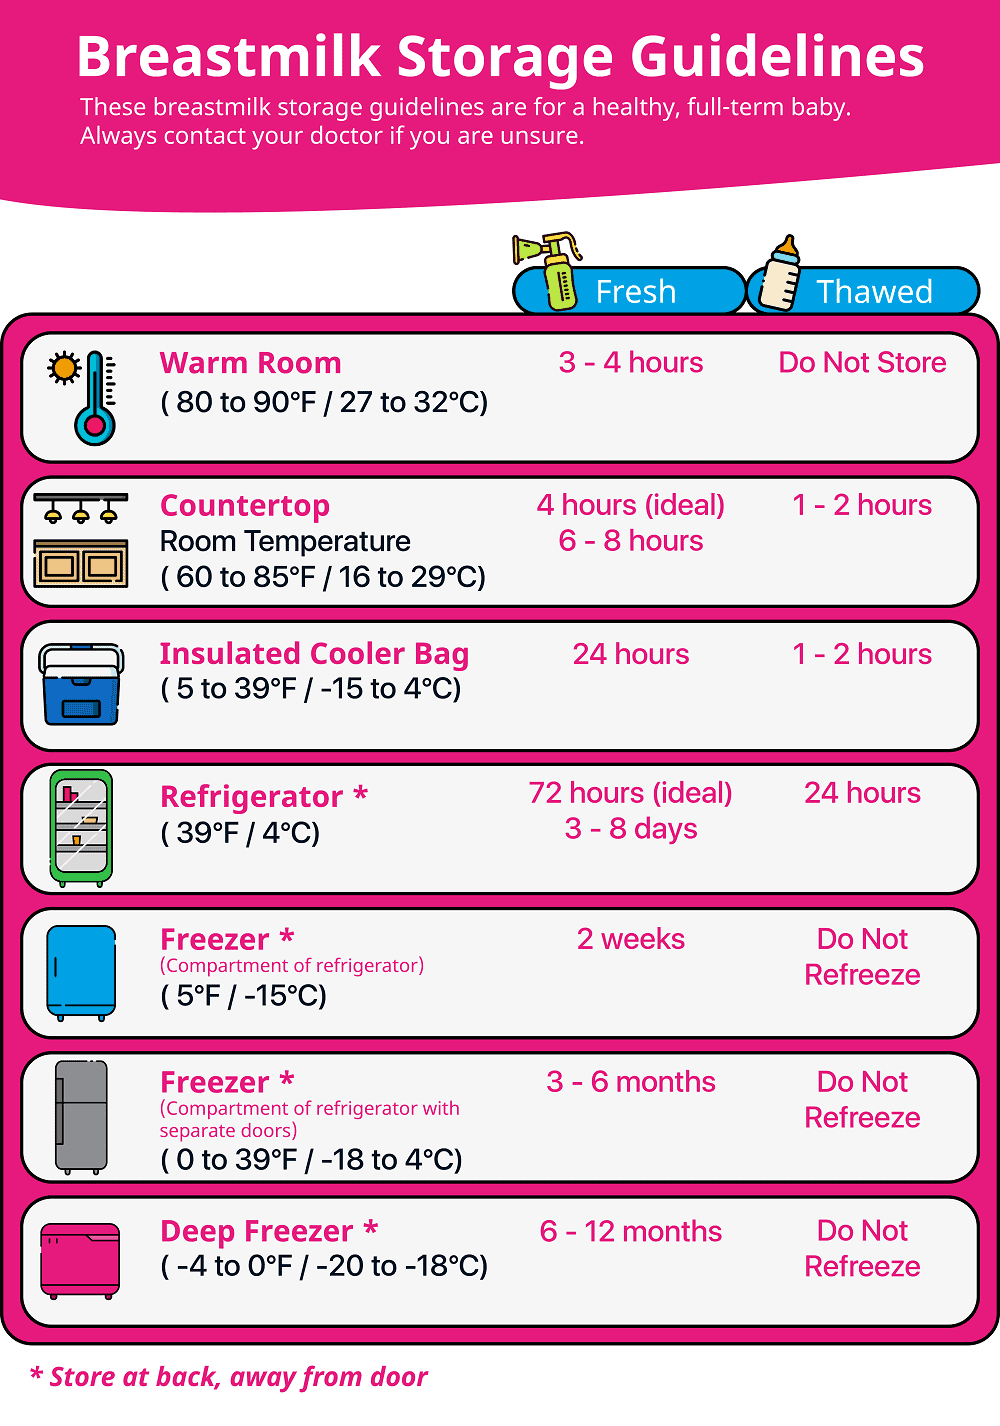
Breast Milk Storage Basics
Once you have collected your milk, you need to store it safely. According to the Mayo Clinic, you can keep breast milk in the fridge for up to four days or in the freezer for about six months for best quality (3).
FAQs

Is Hand Expressing More Effective Than Pumping?
For some women, yes. Research shows that hand expression can elicit a milk ejection reflex (let-down) faster than pumps because of the skin-to-skin contact. It is also more effective at removing colostrum in the first few days after birth.

How Much Milk Should I Be Expressing?
This depends on your goal. If you are relieving engorgement, express just enough to feel comfortable. If you are replacing a feed, aim for 3 to 4 ounces, though this varies by baby age. Remember, hand expression often yields less volume visually than a pump, but the milk is often higher in fat.

How Long Should Hand Expressing Take?
A full session to drain the breasts typically takes 20 to 30 minutes. However, if you are just relieving pressure, 5 minutes might be sufficient. As you get better at the technique, you will get faster.

What is the Best Time of Day to Express Milk?
Prolactin levels are naturally highest in the early morning hours, so many moms find they get the most volume right after waking up. However, you can express whenever your breasts feel full or when you need to skip a feeding.

Will Hand Expressing Make Engorgement Worse?
No, it usually helps. Removing a small amount of milk relieves pressure and reduces inflammation. The key is to express only to the point of comfort (softening the breast) rather than draining it completely, which signals your body to make more.

Can You Hand Express Too Hard?
Yes. If you see bruising or feel sharp pain, you are using too much force. Breast tissue is delicate. Effective expression relies on the correct placement and rhythm, not brute strength.
Why Is No Milk Coming Out When I Hand Express?
If you are squeezing but seeing nothing, you are likely pinching the nipple or your fingers are not positioned over the milk ducts. Move your fingers further back or closer to the chest wall. Relax your shoulders, apply warmth, and try again.
Can I Hand Express While Pregnant?
Many healthcare providers give the green light to hand express colostrum starting around 37 weeks of pregnancy. This is known as antenatal harvesting. However, nipple stimulation can cause uterine contractions, so you must clear this with your doctor or midwife first.
In Conclusion
Hand expressing breast milk is an empowering tool to have in your parenting kit. It ensures you can feed your baby and manage your comfort regardless of whether you have electricity or a working pump.
It might feel clumsy at first, but keep practicing. Your hands are the original breast pump, and they are always with you. If you continue to struggle or feel pain, reach out to a lactation consultant for a quick hands-on demo. You’ve got this!