Our team of moms has wrapped thousands of babies, and we are here to help. In this guide, we will answer your swaddling questions and share our secrets for the perfect wrap. Let’s get that baby sleeping.
Key Takeaways
- Swaddling suppresses the Moro (startle) reflex to help newborns sleep longer.
- Always place babies on their backs and stop swaddling once they show signs of rolling.
- Hips must be loose enough to fall into a natural frog-leg position to prevent dysplasia.
- You can use traditional blankets or modern Velcro and zipper sleep sacks for ease.
How to Swaddle Your Baby Safely
Turning your baby into a mini burrito is the fast track to a happy sleeper, but you must do it correctly.
Loose objects near your infant increase the chance of Sudden Infant Death Syndrome, better known as SIDS. These loose objects include blankets, pillows, and plush toys.
Swaddling offers a safe alternative to loose bedding. It creates a secure wrap that will not slip over their face (1). A proper swaddle is snug enough to provide pleasant confinement but loose enough around the hips to prevent dysplasia.
Swaddling safety is non-negotiable. Follow these essential rules:
- Never place a swaddled baby on their stomach or side.
- Never swaddle a baby loosely; the fabric can become a suffocation hazard.
- Always lay your swaddled baby on their back.
- Stop swaddling the moment your baby shows signs of rolling over.
- Monitor your baby’s temperature to prevent overheating, especially when swaddling in the summer.
How to Swaddle Arms Down (The Diamond)
The traditional “diamond” swaddle keeps arms straight against the sides. This is excellent for newborns with a strong startle reflex, as the snugness provides warmth and security.
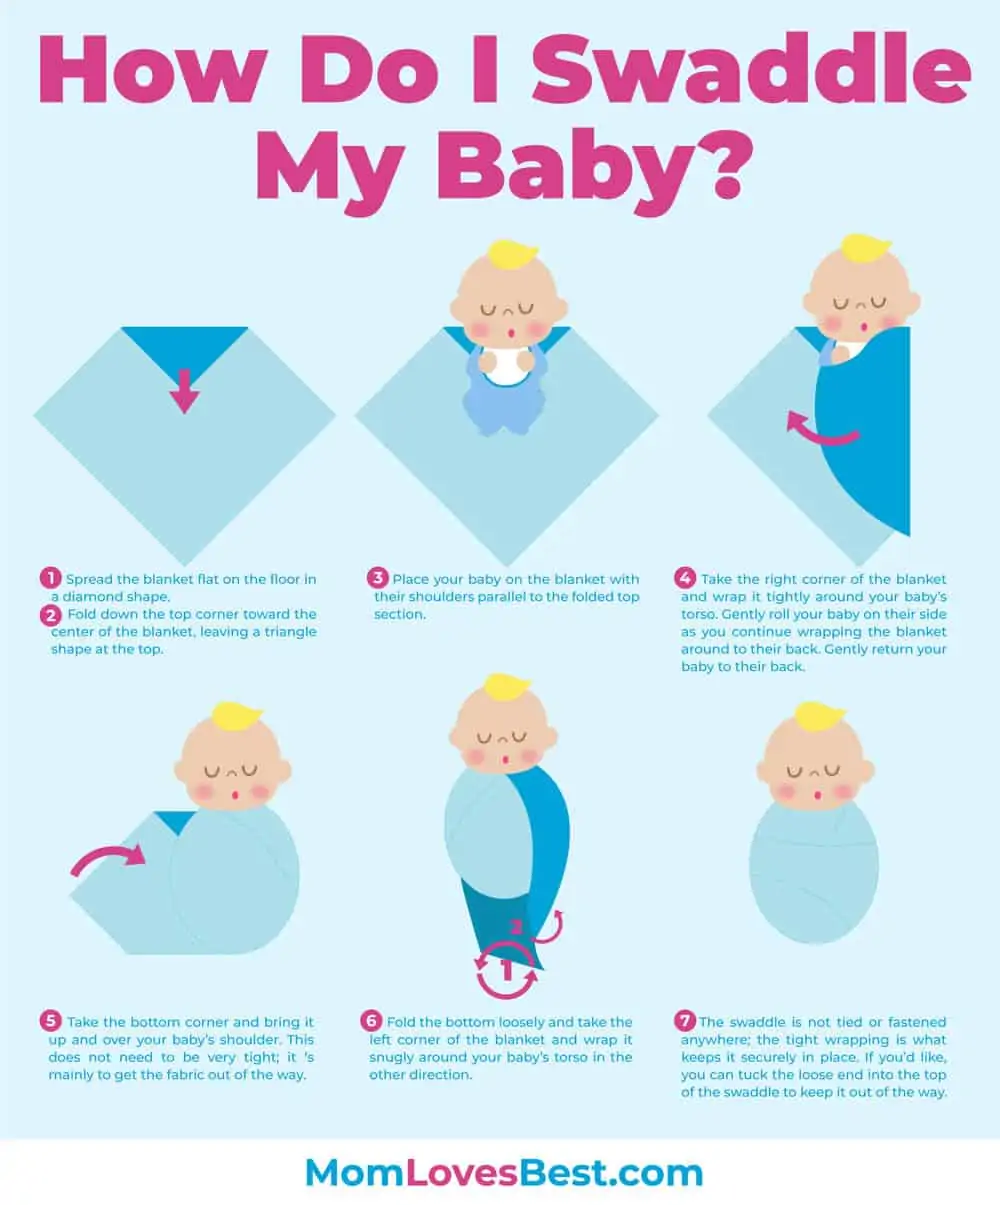
1. Prepare your blanket
Lay your swaddling blanket on a flat surface, like a bed or the floor, so it looks like a diamond. Fold the top corner down. You do not need to go all the way to the center, just enough to create a flat edge for your baby’s neck.
2. Lay your baby down
Place your baby face-up on the blanket. Their shoulders should align with the folded edge so their head and neck remain outside the swaddle. You want to avoid fabric brushing their cheek, as this triggers the rooting reflex and might make them hungry.
3. Perform the first fold
Hold your baby’s left arm straight against their side. Pull the left side of the blanket across their body and tuck it snugly under their right side (underneath the back). Leave the right arm free for now.
4. Bring the bottom up
Pull the bottom point of the blanket up and over your baby’s feet. Tuck the fabric into the top of the swaddle near the shoulder.
Crucial Step: Ensure the leg pouch is loose. Your baby needs to bend their legs up and out in a “frog style” position to protect their hip development.
5. Perform the final fold
Hold your baby’s right arm against their body. Pull the remaining right flap of the blanket straight across their chest and tuck the end underneath their left side. The wrap should be firm but comfortable.
You now have a happy, swaddled baby.
How to Swaddle Arms Up
Babies love the security of a swaddle, but they cannot stay in it forever. Weaning from swaddling is easier if you transition them slowly.
Allowing their arms to be free helps them self-soothe by sucking on their hands. It also prepares them for the freedom they will need once they start rolling.
1. Lay out your blanket
Position your blanket like a diamond on a flat surface. Fold the top corner down further than you would for a standard swaddle. You want the fold to align with your baby’s armpits rather than their neck.
2. Lay baby in the blanket
Place your baby on the blanket with the folded edge running right underneath their armpits. Their arms should be completely outside the fabric area.
3. Tuck the left corner
Pull the left corner of the blanket across your baby’s chest. Tuck it securely under their right side, just under the armpit.
4. Pull the bottom of the blanket up
Bring the bottom point of the blanket up over the feet and tuck it into the fabric on the chest or fold it down. Remember to leave plenty of room for those hips to wiggle.
5. Complete the swaddle
Wrap the right corner of the swaddle across your baby’s tummy and tuck it tightly under their left side. Your baby’s torso is now secure, but their arms are free to move, stretch, and self-soothe.
Swaddling With Velcro or Zipper Blankets
If origami isn’t your strong suit, many companies make ready-to-wear sleep sacks. These feature leg pouches and Velcro “wings” to secure the arms without the hassle of loose fabric.
Here is how to use a standard Velcro swaddle:
1. Place baby’s feet
Unzip the sack or open the pouch. Slide your baby’s legs inside. If there is a zipper, zip it up now so their lower half is enclosed.
2. Engage the Velcro
Most sacks have two “wings.” Hold your baby’s arm down gently. Pull the inner wing across their chest and attach it (usually to a patch on the torso).
3. Secure the second flap
Bring the outer wing across the body and pull it snug. Fasten the Velcro patch securely. Ensure the swaddle is tight across the chest but allows the hips to move freely inside the sack.
FAQs

Do You Put Clothes Under a Baby Swaddle?
Yes, you should dress your baby in a light onesie or pajamas under a swaddle. Check the room temperature to ensure they do not overheat; the swaddle counts as a layer of bedding.

Should Hands Be in or out of Swaddle?
For newborns, swaddling with hands inside mimics the womb and prevents the startle reflex. As they grow (around 2 to 3 months), most babies prefer having one or both arms out to self-soothe.

Can You Let a Newborn Sleep Unswaddled?
Yes, swaddling is not mandatory. However, unswaddled newborns often wake themselves up due to the Moro (startle) reflex, so parents usually get more sleep if they swaddle.

Should I Unswaddle My Baby During Night Feeds?
You can keep them swaddled if they stay awake, but if your baby is too sleepy to eat efficiently, unswaddling them creates a temperature change that helps wake them up for a full feed.

What Is the Difference Between a Swaddle and a Sleep Sack?
A swaddle wraps tightly around the body to restrict arm movement. A sleep sack is a wearable blanket (like a sleeping bag with armholes) that keeps the baby warm without restricting their arms.

When Should You Not Swaddle a Newborn?
You must stop swaddling immediately when your baby shows signs of rolling over (usually 8 weeks to 4 months). You should also avoid swaddling if the baby has a fever or if you are co-sleeping.
How Tight Should a Swaddle Be?
A swaddle should be snug but not constricting. You should be able to fit two or three fingers between the blanket and your baby’s chest. The hips must always be loose enough for the legs to bend up and out.