Forget the pasta necklaces; learning how to make paper mache is the ultimate rainy-day activity for the whole family. Whether you are crafting a simple balloon bowl or a complex piñata for a birthday bash, this messy, hands-on art project is a timeless classic.
The best part about paper mache projects for kids? You likely have everything you need in your pantry and recycling bin right now.
Here is your easy, step-by-step guide to making paper mache glue, prepping your materials, and creating art that lasts.
Key Takeaways
- Choose your paste: Use a simple flour-and-water mixture for easy cleanup, or white glue for a stronger, mold-resistant finish.
- Prep your form: Use balloons, cardboard, or crumpled foil as the base structure for your sculpture.
- Layer it up: Apply at least 3 to 4 layers of paper strips, letting the project dry completely between sessions.
- Seal the deal: Allow 24 hours for drying, then paint and seal with varnish or Mod Podge for longevity.
Paper Mache Ingredients and Supplies
Ready to get your hands dirty? Before you start dipping and dripping, you need to gather your tools. The beauty of this craft is its simplicity.
Here is the essential supply list for paper mache:
- Large mixing bowl: A plastic container or disposable bucket works best for easy cleanup.
- Adhesive base: White school glue, flour, or Mod Podge.
- Paper: Newspaper is the gold standard, but printer paper or tissue paper works too.
- Structure/Form: Balloons, cardboard boxes, chicken wire, or aluminum foil.
- Applicator: Your hands are the best tool, but a cheap paintbrush helps smooth things out.
- Oil or Vaseline: To keep the paper from sticking permanently to your base form.
3 Easy Paper Mache Paste Recipes
You don’t need store-bought chemicals to make this work. Here are the three most popular ways to make paper mache paste, depending on what you have in the cupboard:
- The Classic No-Cook Flour Paste: This is the easiest method for young kids. Simply mix one part all-purpose flour with one part water. Stir until you get a consistency similar to pancake batter. If it is too thick, add a splash more water; if it is too runny, add more flour.
- The “Strong” Cooked Paste: For a smoother, stronger finish, use heat. Whisk 1/2 cup of flour into 2 cups of cold water in a saucepan. Bring it to a boil while stirring constantly. Let it cool completely before using. This creates a clear, gel-like paste that dries hard.
- The Mold-Resistant Glue Paste: If you want your project to last for years, skip the flour. Mix two parts white school glue (PVA) with one part water. This version is less likely to rot or attract bugs and dries with a slightly flexible, durable finish.
Step-by-Step Paper Mache Instructions
Got your paste mixed and your sleeves rolled up? Follow these steps to create your masterpiece:
- Prep your workspace: Cover your table with a plastic tablecloth or trash bags. This process is incredibly messy, and dried paste can be a pain to scrub off wood tables.
- Tear your paper strips: Rip newspaper into strips about one inch wide. Do not use scissors! Torn edges have exposed fibers that mesh together better, creating a smoother surface than cut edges.
- Prepare the form: Inflate your balloon or tape your cardboard structure together. If you plan to remove the form later (like popping a balloon), coat it lightly with cooking oil or petroleum jelly so the paper slides off easily.
- Dip and strip: Take a strip of paper and dip it into your paste. Run the strip between your index and middle finger (like a squeegee) to remove excess glue. You want the paper wet, not dripping.
- Apply the first layer: Lay the strip over your form and smooth it down with your fingers. Ensure there are no air bubbles or wrinkles.
- Build your layers: Continue applying strips, overlapping them slightly. To create a strong structure, lay the strips in different directions (criss-cross pattern). Aim for 3 to 4 layers total, but let the project dry partially between layers if it gets too soggy.
- Let it dry completely: Place your project in a warm, dry spot. It usually takes 24 hours to dry fully, but humid climates may require up to 48 hours. It should feel lightweight and hard when tapped.
- Remove the form (optional): If you used a balloon, pop it and pull it out. If the edges are rough, trim them with scissors.
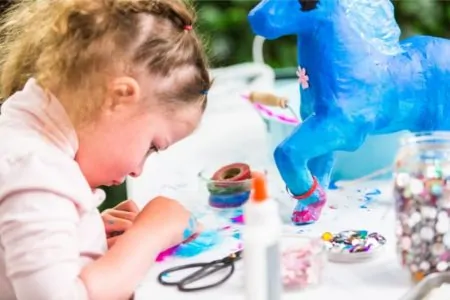
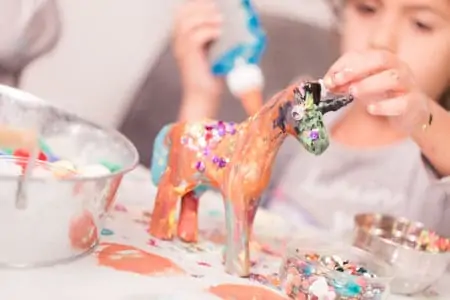
- Decorate: Once fully dry, paint your creation with acrylics, add glitter, or seal it with a clear varnish spray.
FAQs About Making Paper Mache
Even the best DIY projects can go sideways. If your paste is clumping or your balloon collapsed, don’t worry. Here are the answers to the most common questions we get about paper mache.
Is Glue or Flour Better for Paper Mache?
It depends on the longevity of the project. Flour is cheaper and non-toxic, making it great for quick crafts with toddlers. However, flour is organic, meaning it can eventually rot or grow mold in humid conditions.
Glue (PVA or white school glue) is the superior choice for permanent projects. It dries faster, creates a harder shell, and will not spoil over time. If you are serious about sculpting, consider specialized products like Elmer’s Art Paste or ACTIVA Fast Mache.
Pro Tip Preventing Mold
Can You Use Toilet Paper for Paper Mache?
Yes, you can use toilet paper to create “paper mache clay” (pulp). Instead of strips, you soak toilet paper in water, squeeze it dry, and mix it with glue and joint compound. This creates a moldable putty that is perfect for adding fine details, noses, or eyebrows to a sculpture.
What Paper is Best for Paper Mache?
Newspaper is the best option because it is porous, soft, and cheap. It absorbs the glue quickly and molds around curves easily.
For a smoother finish, use brown kraft paper or paper towels for the final layer. If you are making a lantern or something translucent, white tissue paper is excellent. Avoid glossy magazine pages or thick cardstock, as they do not absorb the paste well and will peel off.

How Long Do You Have to Let Paper Mache Dry?
Patience is key here. A standard project needs at least 24 hours to dry completely. If you apply too many layers at once (more than 3 or 4), the inner layers may stay wet and rot.
To speed up the process, place your project near a fan, a dehumidifier, or a sunny window. Do not put it directly in the oven, as the heat can cause the balloon inside to expand and burst your sculpture.

Why Do You Add Salt to Paper Mache?
Salt is a natural preservative. When using a flour-based paste, adding roughly one tablespoon of salt per cup of flour helps prevent mold and bacteria from growing inside the layers of paper. This is especially important if you live in a humid climate where drying takes longer.

Why Is My Paper Mache Not Hard?
If your project feels squishy, it is likely not fully dry yet. Humidity plays a huge role; if there is moisture in the air, the paper absorbs it.
If it is dry but flimsy, you simply need more layers. A sturdy piñata or bowl usually requires at least four to five layers of newspaper. Let the current layer dry, then add two more layers of paper and glue to stiffen it up.
How Do I Make My Paper Mache Smooth?
To avoid a bumpy “brain-like” texture, use torn edges rather than cut edges on your paper strips. For the final layer, use plain white printer paper or paper towels. Once the project is 100% dry, use fine-grit sandpaper to gently sand down any ridges or lumps. Finally, coat the piece with Gesso (a canvas primer) before painting to fill in small gaps.
Mastering Paper Mache
Now that you have the recipe down, the possibilities are endless. From custom Halloween masks to decorative bowls, paper mache is the perfect way to turn trash into treasure.
Remember, the secret ingredient is patience. Let those layers dry thoroughly, don’t be afraid to get messy, and let your creativity run wild. Grab that old stack of newspapers and start crafting!